Cybersecurity case study of MedusaLink
In this article, I am going to present and document a cybersecurity case study that I carried out on MedusaLink.
1. Table of Contents
2. Introduction
Goals
The aim of this project was two-fold.
The first goal was to assess and improve the defensive capabilities of MedusaLink. While I always had an eye on the security aspect during implementation, with 30+ users and having been in production for a year, I decided this deserves a bit of dedicated attention.
The second goal was for me to gain practical experience with application security. I am currently aiming for a switch into cybersecurity, and this project was just the right opportunity for me to get a bit more hands-on with a real-world case, without having to deal with an overwhelmingly large project right away.
What is MedusaLink?
MedusaLink is a marketing platform unifying the principles of traditional cashback programs, coupon codes and word-of-mouth marketing. Through MedusaLink, online shoppers can access discounts, promoters can earn commissions, and merchants can attract new customers.
The project has been in development since September 2024 by a two-man team: my former colleague who came up with the idea and handles business development, and myself who is responsible for everything technical from implementation to operation. MedusaLink first went live in production as an MVP in July 2025. As of this article in August 2026, it is still running and has 30+ users, but is no longer being actively developed.
Scope
As a first step, I threat modelled the application in order to get a good grasp of what I'm dealing with. Then I drafted and executed SAST/DAST test cases for each component of the system. Next, I analyzed the findings of both previous steps, decided on courses of action, and addressed the discovered weaknesses wherever applicable. Finally, I integrated basic security testing into my CI/CD pipeline as a safe guard for any additional features going forward. I continually documented my steps the entire way as a reference to myself and as an aid for writing this article.
Disclaimer
Naturally, writing a publically accessible article about the security measures of a project can be a bit delicate and reveal details you may not want malicious actors to know about. Therefore I tried to omit specific details where possible without losing substance. The emphasis of the article is more the process rather than the specifics.
3. Phase 1: Threat Modeling
As I only had surface level familiarity with threat modeling, I first did some research and found the Threat Modeling Manifesto which defines the process as 4 questions that need to be answered.
- What are we working on?
- What can go wrong?
- What are we going to do about it?
- Did we do a good enough job?
What are we working on? - MedusaLink architecture
MedusaLink is very simple in terms of architecture: we are using a JSON-based RESTful API with a relational database, and a frontend UI in front of it, in this case a Typescript-based Nuxt application. Additionally, parts of the API are not accessed through the frontend and are meant for external, customer systems to integrate with as well as various admin-level operations.
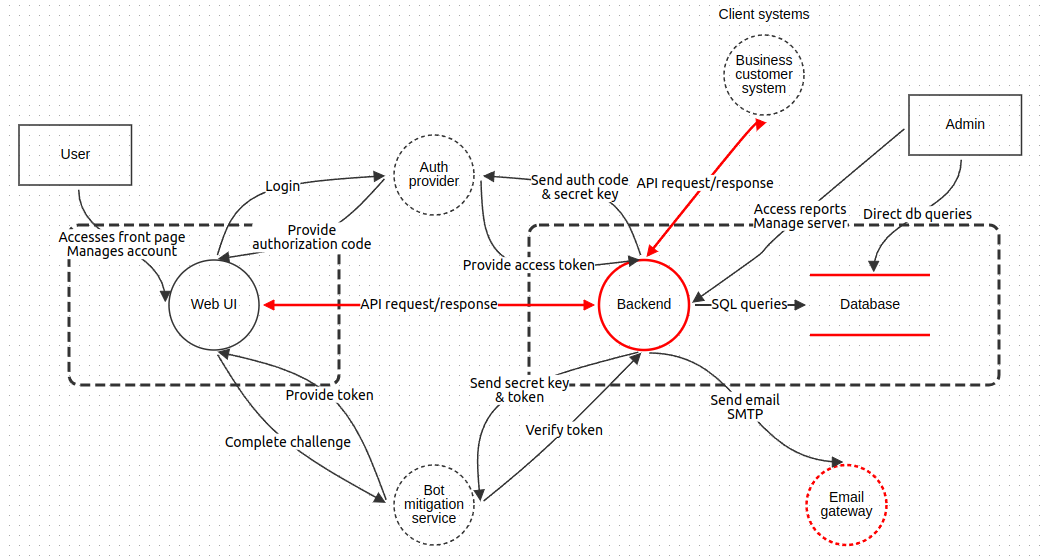
What could go wrong? What are we going to do about it?
Identifying possible threats was a bit more challenging than I anticipated. The main reason was that I was missing a structured approach so I couldn't guarantee I didn't miss anything. Even the cheatsheet only mentions approaches like brainstorming, or at a higher level using something like MITRE ATT&CK. I also found the DFD and STRIDE itself a bit awkward to work with, but let's not get into detail about that here, I will talk about it a bit at the end.
For the sake of not letting the project take forever, I decided to simply evaluate components one-by-one, try to come up with possible vulnerabilities myself as well as reference the OWASP Top 10, and map these to components in the DFD and to STRIDE categories. Some items that didn't fit in there neatly were documented in a separate markdown file.
Below is a summary of my findings. In order to not expose too much, I decided to only include general summaries of the areas I decided to pay special attention to. In short, many of these categories were already handled, but some needed further mitigations. I decided what actions I would take on each item as well, but left implementation for later.
- MITM
- Injection attacks
- DoS/DDoS attacks
- Session hijacking
- Access control failure
- Repudiation
- Supply chain risks
Did we do a good enough job?
While reviewing and validating the threat model is not 100% possible when working alone as there simply aren't multiple eyes to spot gaps, I did my best to ensure a few basic criteria are met by referring once again to the cheatsheet.
Phase 2: Discovery
After completing threat modeling, my next goal was to run some SAST/DAST tests. The two components to be tested were the frontend and backend.
SAST
Initially, I was eyeing SemGrep for static analysis, however I found out that while their core is free and open source, the project has now transitioned to a paid proprietary model. Luckily, OpenGrep exists as a FOSS alternative under the LGPL license, and just like SemGrep, supports both Go and Typescript.
The fact that OpenGrep provides a simple CLI also appealed to me: all we need to do is run opengrep scan --sarif -o OUTPUT_FILE in the root directory of the backend project. This simplicity also meant that this would be very easy to integrate into my CI/CD pipeline later.
For the backend codebase, 5 potential problems were found, all of them only warning level:
- Two of them were about the lack of TLS in the server executables. This is actually fine, since HTTPS is handled at the infrastructure level, and for local development specifically, HTTPS would only complicate things.
- One was about a usage of the
text/templatelibrary instead ofhtml/templatefor a server-side rendered page. The difference is thattext/templatedoes not escape HTML content by default. While the page in question doesn't display any user-entered content, I switched tohtml/templateanyway as a future safeguard, and also because it simply makes more sense to use a library that is meant specifically for the purpose of HTML rendering. - One was about an explicit integer cast via the
int32()function after parsing said integer viastrconv.Atoi(). This was inside a bit of code processing JWT tokens, so this finding made me a bit concerned that there could be a way to exploit an overflow. However on closer inspection this is not possible, as the value we are casting is guaranteed to be an unsigned 32 bit integer before it ever made it into the token. Therefore unless the JWT signing secret is compromised (at which point we would have much larger problems), this is fine. - One is about the usage of the less secure
math/randpackage instead ofcrypto/rand. The code where this occurred was the one responsible for generating the 4-letter codes that identify promoters in our system. These codes are unique, public and meant to be shared, thereforemath/randis fine here.
For the frontend codebase, additional --include and --exclude patterns needed to be specified because otherwise opengrep would not have looked at .vue files, meanwhile we don't want to scan the infamously enormous node_modules. Likewise no major findings were reported by opengrep.
DAST
For dynamic testing, I spent a bit more time than I would have liked picking a tool. I was familiar with Burp, however it felt like too large and complicated of a tool for what I needed, not to mention some of the tools that would have been most useful to me are not available in the free version. An alternative I looked at was Zaproxy, but I likewise found it too large for my needs and it also had performance problems where running large scans would eat up so much RAM that it would freeze my entire system.
After some digging around, I found vulnapi. It is a more minimal alternative that does exactly what I need and little more: it's fast (being a mere CLI program), lightweight, open source under the MIT license, and to top it off, built in Go which I always like seeing.
However, vulnapi is specifically meant for testing APIs only, for the frontend, I would need a different tool that can also attack HTML pages, including JS-heavy ones. I found Wapiti, also a command-line tool with many options, including the ability to explore frontend applications, just as I needed.
Scanning the backend API
vulnapi supports OpenAPI specification based scanning. Luckily, this was already present for MedusaLink, however due to the limitations of the library I used, only in version 2.0. vulnapi doesn't state official support for this and it also didn't work when I simply tried, therefore I first had to convert the spec to version 3.1 via the official Swagger Editor.
An additional preparation step was to implement a backup-restore functionality for the test database, as the scan would pollute the database with records that I didn't want to keep around after the testing. I implemented this via two simple shell scripts.
As the test environment is running on a small VPS, I also decided to rate limit all my testing to 10 requests per second. This is probably far below what the server could actually handle, but it was fast enough for my purpose.
As the application has a few different types of users and different authentication mechanisms, I identified the following scopes that each needed to be tested:
- initial discovery scan: no auth needed, swagger spec not used
- non-authenticated user
- regular user, i.e. "promoter"/"agent": OAuth 2.0 for initial register and login, then cookie-based authentication with server-side session
- business customer, i.e. "seller"/"merchant": API key based authentication
- admin user: API key based authentication (separate from the one used for sellers)
The initial discovery scan looking for commonly exposed paths only discovered our healthcheck endpoint and the fact that we are using a Traefik reverse proxy on the test environment. This doesn't mean a whole lot since this is only a list-based discovery and not a full crawl, but at least we know we are not accidentally exposing anything low-hanging.
With all this considered, my scans would look something like the following. For cookie-based sessions, the session cookie had to be passed manually and the OpenAPI spec needed to be edited to exclude the logout endpoint, as a call to that would mess with the later results.
vulnapi scan openapi --rate 10/s swagger.yml --security-schemes [API key key-value pair]
The only findings were about a few missing security headers in the HTTP responses, namely:
Access-Control-Allow-Origin: this sounded concerning especially since I remembered adding this earlier, however I found this to be a false alarm sincevulnapidoesn't pass theOriginheader with the request (and neither does any command line tool), in which case the omission of the CORS headers is expected standard behavior. When adding this manually, the CORS headers are correctly included in the response.Content-Security-Policy: since the backend does have an endpoint that directly renders HTML, including the header for this one page is absolutely necessary. For JSON-based RESTful API endpoints, it is not strictly necessary, however there is no harm in including a default strict policy such asContent-Security-Policy: default-src: 'none'; frame-ancestors 'none';(since the frame ancestors policy missing was another warning).X-Frame-Options: this is an older equivalent of CSP and is not necessary to include.Strict-Transport-Security: we are already only allowing HTTPS connections on the test and production environments, so there is no reason not to signal this fact via the HSTS header.X-Content-Type-Options: there are currently no file uploads anywhere in the application, therefore MIME sniffing attacks are not a danger. However, including this header takes minimal effort and will be there as a safe guard for any potential upcoming features. Meanwhile, theContent-Typeheaders are already set correctly everywhere in the application, therefore includingX-Content-Type-Options: nosniffhas no drawback.
Scanning the frontend application
wapiti already includes most tools (which it calls "modules") that we need by default, with a few additional ones that made sense to enable via the -m argument. Wapiti can also use a headless Firefox browser, which is something we do want when working with a JS-heavy SPA like ours. Limiting the request rate yet again was necessary, albeit Wapiti doesn't provide a direct req/s adjustment, but an "intensity" switch instead as well as the ability to limit the number of parellel requests running at a time. I ran my scan as follows:
wapiti --headless=hidden -S=polite --tasks=2 -m=common,csrf,buster,methods -u https://test.medusalink.com
The scan only discovered the same missing headers as in the case of the backend, and in this case, those headers were much more important to include as well.
Dependency scanning
Supply chain vulnerabilities have unfortunately been an area I'd mostly ignored up to this point other than basic sanity checks when picking my dependencies and occasionally updating them when I remembered. This is problematic since this class of vulnerabilities is third placed in the 2025 OWASP Top 10. After enabling Dependabot alerts, 150 vulnerabilities were discovered, most of them in npm packages, some of them high or even critical severity. I marked these as to-be-resolved in the next stage as well.
Phase 3: Remediation
Once I was done identifying potential vulnerabilities, it was time to address them. I first looked at the issues find by Dependabot as these were the largest in number, most severe, and meanwhile also potentially fixable by just upgrading everything.
Next, I fixed the findings of my SAST/DAST tests as these were trivial to implement and test. As for the higher level areas identified during threat modeling, many of these were already well covered, however some are more interesting to look at.
Supply chain
As mentioned, the initial Dependabot scan found 150 vulnerabilities in total. Fortunately, all of them were fixed by simply upgrading every dependency to their newest version, albeit this introduced a few bugs and came with a few painful migration processes. By letting Dependabot auto-generate patches and regularly taking a look at them, this workload will be more manageable in the future.
Rate limiting
Next to the usual overall and per-ip limits, I also opted to include a per-seller rate limit, the rationale being to mitigate a case where a business customer's system gets taken over by an attacker who then tries to use this foothold to DoS MedusaLink itself. The per-ip rate limit would likely defend us against this anyway, but by also limiting the requests per seller, we also protect them. A sudden burst of incoming transactions would be highly unusual in the first place, so this way we can also limit the number of fraudulent transactions that will make it into MedusaLink (and later need to be cleaned up) in case of a compromised customer system.
Another decision was whether to handle rate-limiting on the infra level or the application level. Our hosting provider, Render provides DDoS protection via Cloudflare, however Render states that likely not everything will be filtered out, since it can be difficult to tell apart legitimate and malicious layer 7 traffic. Because of this, and the per-seller rate limit, application level handling is still necessary.
The overall and per-seller limits were trivial to implement using the go-chi/httprate library, while the per-ip limit was a bit more challenging due to the differing ways in which proxies, providers etc pass the real ip of the client. Render uses Cloudflare, however unlike Cloudflare it places the real ip into the first slot of the x-forwarded-for header. It does however pass CF-Ray down to us, so we can use this header to detect that we're on Render. Meanwhile on the test environment, Traefik places the real ip into the last slot of x-forwarded-for.
Logging
After reviewing all the logs the application produces, I found that they were not detailed enough and some operations were not documented beyond simple request logging. I added logs for all important operations, paying special attention to admin level ones. I also re-worded and added detail to already existing logs.
Another important way in which logs can help mitigate repudiation issues is retention. Render's cheapest tier offers only 7 days of log retention. While this is not ideal, the alternatives would be upgrading to a higher tier which would be significantly more costly, or streaming logs to a third party provider, however the options I looked at are also not much better in terms of pricing and retention. Therefore I decided to leave this as is.
Finally, another way to make logs more reliable is by cryptographically ensuring their integrity. This would be complicated (and not advisable) to handle inside the application, while Render seems to provide no easy (or cheap) way to achieve this. Therefore I also decided to leave this out for now.
Phase 4: Automation
I was originally planning this last phase as a ground to get to know DevSecOps practices a little better, however in practice this section ended up being shorter than I expected.
As mentioned, I enabled Dependabot alerts for the project as well as automated pull requests for security patches and version bumps. Additionally, the SAST scan via OpenGrep was easy to integrate due to a GitHub Action already being available for this. Conveniently, the sarif reports can also be uploaded to the Security tab of the repository, which is the same place where Dependabot alerts live.
DAST on the other hand is a tougher nut to crack. I decided not to automate this for now as it would require quite a bit more work on the infrastructure front. For now, running these scans manually pre-merge against the test environment will do.
Closing words
My goal when starting this project was to dip my toes into the field of Application Security, as well as strengthen the defensive capabilities of MedusaLink. I am happy with how the project went and I would definitely say that I've succeeded in both goals.
My three most important take aways are the following:
- Threat modeling is essential for any piece of software, although it's still a bit unclear to me how best to do it. Marking vulnerabilities directly inside the DFD felt a bit awkward and unnecessary, and I didn't feel like I got much practical value out of using STRIDE: I basically never thought about it again after I was done with threat modeling. Next time I do something similar, I would consider trying other methodologies and research my options. At the same time, I was also missing a more structured approach that would give my a bit more assurance that everything important has been covered. I might look at something like MITRE ATT&CK next time.
- I'd already known that regular updates are very important, but I'd never quite internalized just how much. Seeing 150 Dependabot alerts pop up, and seeing almost all of them go away by just updating everything hammered this point in for me. Keeping dependencies up to date is something that requires regular attention, absent mindedly bumping versions every now and then is not enough.
- Like many, I also share a slight dislike of npm in general, but I've never been this concerned about its mere existence before. And this thing is everywhere: if you need any amount of client side interactivity, you're almost certainly using JS/TS, which almost certainly means you're using npm or a similar package manager.
Overall, I've enjoyed this project a lot and it has been exactly the learning opportunity I'd intended it to be. It's also made me all the more excited about entering the world of cybersecurity and made me realize just how much more there is for me to discover, which I'm looking forward to.